

You can make these!!
After stopping by my local craft shop, me and Sophie stopped by to talk to the lady at the counter about a few things we had ideas on. The idea was to make coasters from fabric but still have them seal. Kind of like those glass chain tile necklaces people make.

::Here is what you need::
Stack of coasters (wood, plastic, it doesn't matter approx 4"x4")
Foam paint brush
Fabric choices approx 4"x4" charms
Jar of Mod Podge (I used the glossy version)
Krylon clear finish
(For those who have asked, I bought my white coasters at Craft Warehouse for 6.99 and it came with the box to hold them. There is a website on the back of the product that says http://www.sierrapacificcrafts.org/ out of Wilsonville Oregon)

First, Trim your charms down to fit your coasters. I wanted to make sure that they did not go over , and showed just a little of the white paint from the wooden coaster I was using.

Next, use the foam brush to lightly coat the top of the wooden coaster. Make sure that this is a thin layer and does not have any bubbles in it. After You have covered the entire top of the wooden coaster, lay your fabric charm over the glaze that you just applied on the top. I used my hands to press the fabric down against the glue. (hey they are washable, a little glue never hurt anyone)

After you have the fabric centered on the wooden coaster, in a daubing motion cover the fabric with the mod podge glue completly. This will dry clear so don't worry about the look of it as of now. Make sure you coat the edges of the fabric very well so that fraying does not occur.

Let your coaster dry for a few hours. After they were pretty dry, I added a second coat to them and then set them aside again for a few hours more.

I also played around with some patchwork ideas, that could be fun to, so long as you press your seams open it worked fine for this project.
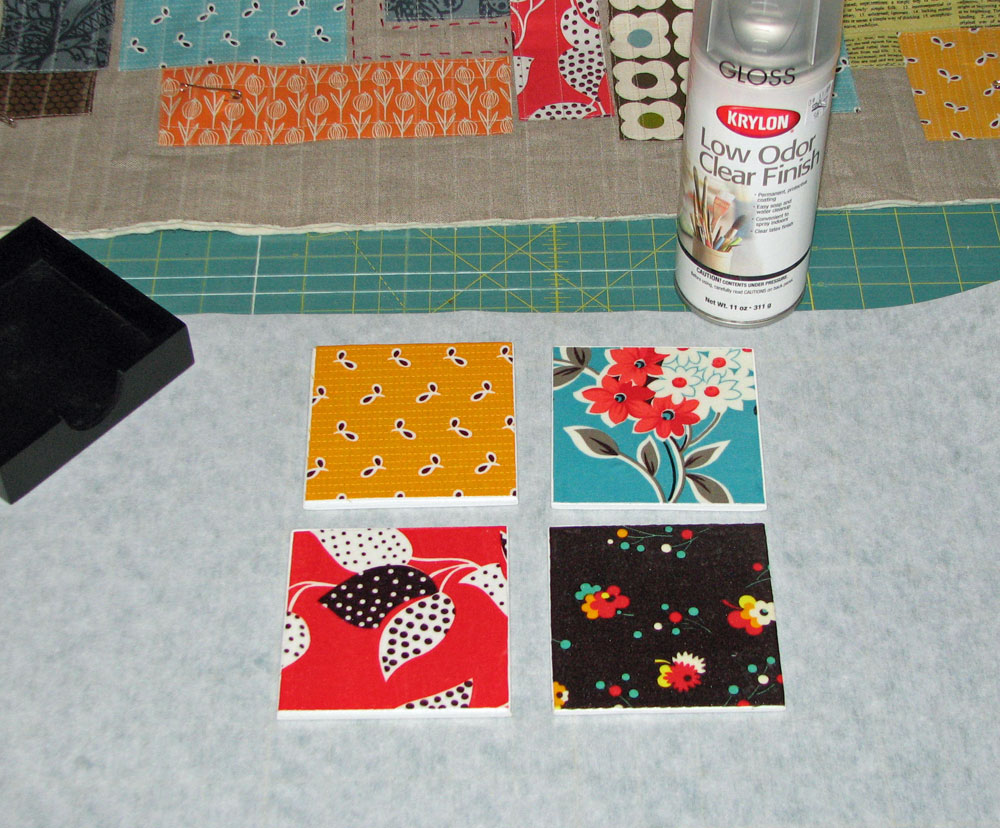
After your coasters are fully dried, take them to a dry place and spray them with a Krylon clear coat. I also added two layers of this as well. It takes about fifteen minutes to dry in between coats.

This idea originally was for my Urban swap partner, but I had to share with all of you. I think they will look great with the kitchen rug I made. (reveal coming soon) The coolest part I thought, was these fabrics are my favorites, now they can be displayed where I can see them all the time, and the process of making these makes them even brighter and more defined then the actual fabric alone.
I would suggest that you let the coasters dry at least 48 hours before using them. They are sealed to wipe liquid off, but they are not dishwasher safe.
I hope you all make some to. I really hope my partner loves it.
On another note a few people were asking about the coasters I had gotten for the Mod Podge tutorial. For those of you that could not find any I have a few sets left to destash but not many if your interested. The prices include shipping but please make sure that you choose the correct country.
HAPPY CRAFTING!
Awesome idea Terri! thanks for the tute!
ReplyDeleteGreat tutorial! The coasters are really nice! Can't wait to see the kitchen rug! Sharonj.
ReplyDeleteTerri, this is an excellent tutorial and a wonderful idea for a gift.....I'm thinking Christmas gifts. Thank you for sharing!!!
ReplyDeleteoh oooh these look awesome Terri
ReplyDeleteare you kidding me??? get your bootie over here and show me how to make these in person!!!!
ReplyDeleteWow, I love them! I am definitely going to make few.
ReplyDeleteWhere did you get your plain coasters from?
I can't believe your cleverness and creativity!
ReplyDeleteAnd the other part of your swap IS NOT A RUG! NOT FOR FEET! Don't make me come over there!
wait for me!! don't start the demonstration without me!! ;)
ReplyDeleteabsolutely amazing, terri!! you are soo clever!!
Those are so adorable!! I picked up some heavy cardboard coasters just a month ago and planned to sew cute little coaster covers for them. This looks like a great plan too.
ReplyDeleteI love them Terri! this is such a great idea, thanks for sharing how you did it!
ReplyDeleteLOVE! Thanks for sharing!
ReplyDeletethis is such a cool idea and they look so great
ReplyDeleteThese are AWESOME!!!
ReplyDeleteFantastic idea (of course)!
ReplyDeleteAwesome!!! Now to track down some wooden coasters :)
ReplyDeleteI am so going to have to make a set (or two) of these. They are fantastic. Thanks for sharing. I am thinking of making a matching set for a table runner.
ReplyDeleteThese are really cute - what a great idea!!
ReplyDeleteLOVE it - cute, cute, cute!! Thanks for sharing your great tutorial :-)
ReplyDeleteLindsay
great tut! thanks!
ReplyDeleteWhat a great idea!! These will make great gifts. Thanks for sharing!
ReplyDeleteVERY cute - I love those fabrics!
ReplyDeleteHave you tried them with thicker fabric, like a light corduroy or the decorator weight fabrics? i might do that....
ReplyDeleteThese are awesome, I would totally make them.
ReplyDeleteI love this idea and I have been making them, but they are driving me crazy. I have tried thin layer, thick layer, no bubbles, sponge brush, my finger, and I've looked to every website, but I continue to get air bubbles in my paper. This makes it seem so easy, but I seem to be having a very difficult time.
ReplyDelete